Showing posts with label DIY. Show all posts

Friday, 6 May 2011

Time to set up the trellis

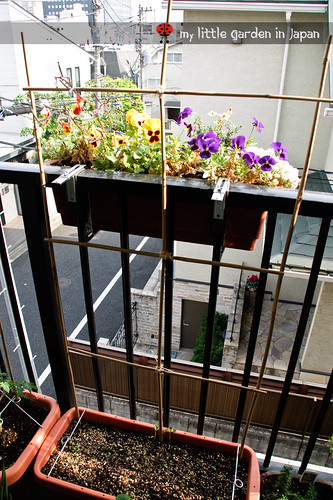
This week I had a chance to set up the trellis for most of the new climbing crops. I also had to redo the grape one, because, when I moved I had taken it down. Now everything is ready for growing the season. I can't wait to see the tomatoes, beans and pumpkins climbing around.

time-to-set-the-trellis-4

The "A" structure can hold a lot of weight


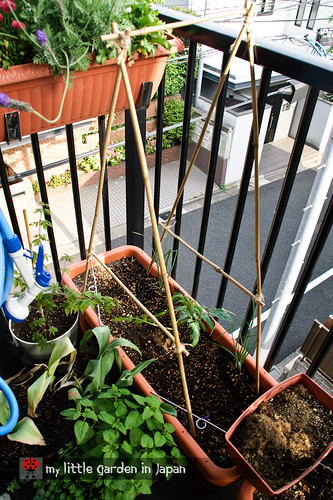
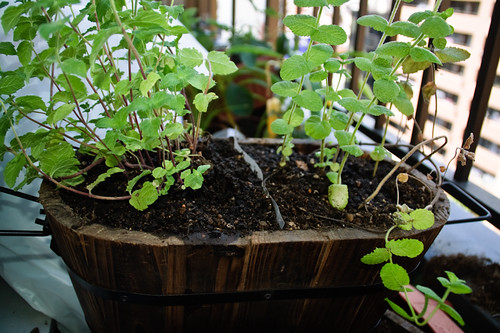
I did a different set up for every planter because they will all grow differently. One of the biggest is the big tomato, I think this will need the most support so I tried an A shaped trellis. For the mini tomatoes, a small square one for each will work well. And finally for the beans and pumpkin planter, I did a normal square wall. I hope they will be strong enough to carry everything.

time-to-set-the-trellis-2

I have always liked this style of japanese trellis and knot


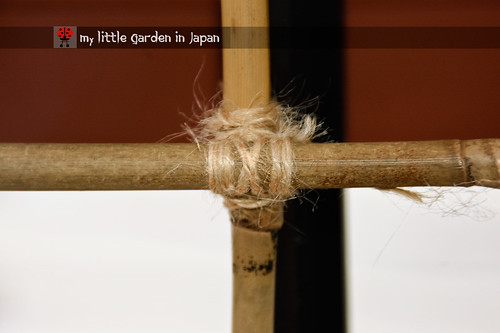
Of course I had to try doing the Japanese style. I used bamboo and japanese knots. I like how it works with trellis, the bamboo looks very nice, and when tied with that knot is very strong and secure. The only thing is that, because the bamboo I use is slim and not processed, it rots easily. So, I can only use it for temporarily structures like these seasonal supports.

time-to-set-the-trellis-5

I am hoping to see this little fence covered with plants by summer


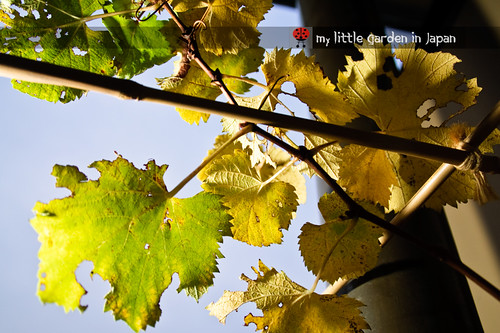
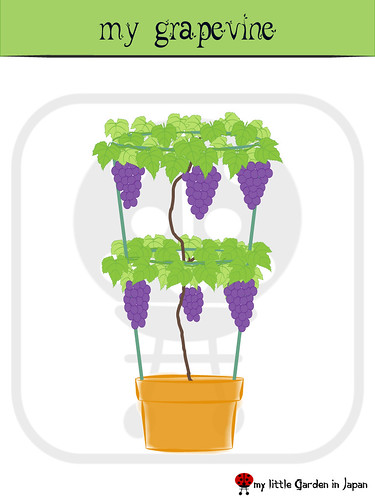
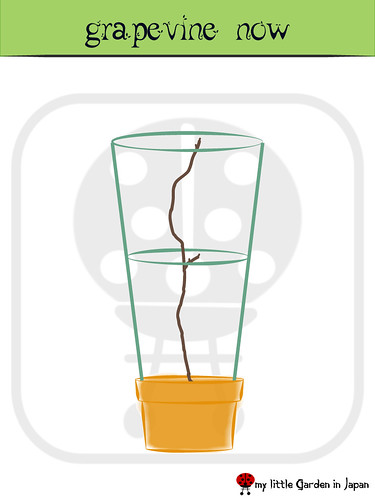
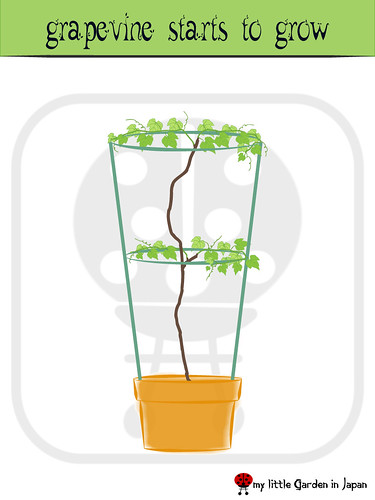
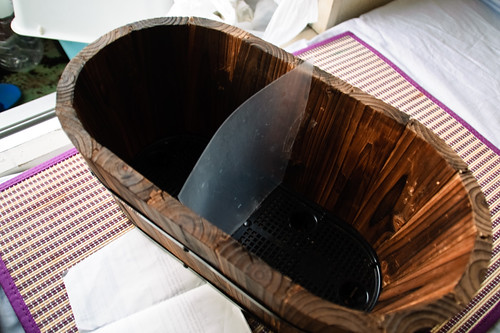
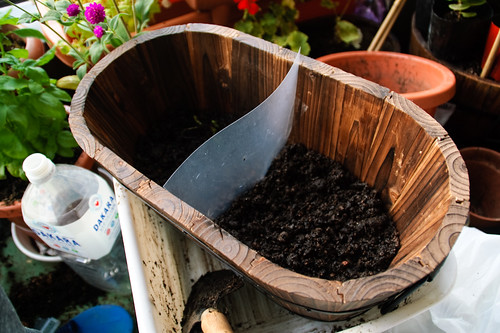
Now for the grape, because it has to be a permanent structure, I used metal/plastic rods. Since my grape is only on its first year and is still very young, not much strength is required yet to hold it.

time-to-set-the-trellis-3

Four pilars should hold everything nicely if they have a good knot


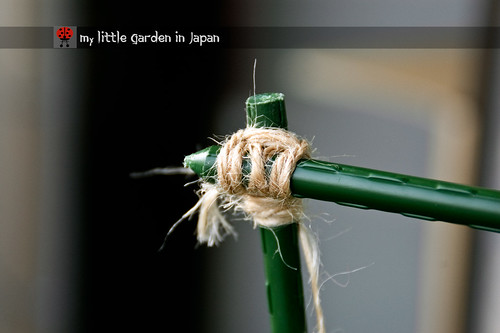
I set four pillars and two rods joining them in across to secure all. However, in the future, when the grapevine gains more weight I will add two more rods across at the middle level for extra strength.

time-to-set-the-trellis

With a little time, it will fill up all around


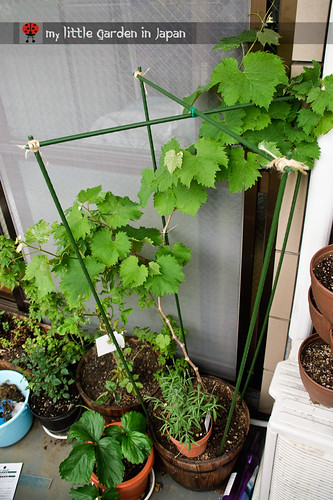
Thank you very much to those who asked about the grape structure! I hope this helps


Please help japan with a donation or good thoughts.


Help Japan

My best hope for those in Japan. You can help donate here.

Amazon
Google Checkout
Donation For Japan Earthquake 11th March 2011
American Red Cross
International Medical Corps
AmeriCares
Donate with Paypal
causes.com

Wednesday, 26 January 2011

How to set a plant in a container

Some time ago I had a couple friends ask me about how to start their own little garden. They had never really tried gardening beyond having a little indoor plant they bought out of a whim, so growing their own vegetables and mayor crops felt a bit too overwhelming. They wanted to know all the basics and I was very happy to answer all of their questions and get them started.

One of their first questions was how to set a plant to grow in a pot. I think this is a very good question, one that many people who is starting also have. So I decided to make a post about it. Here it is, a small introduction to container gardening for anybody wanting to start their own garden. I made it back when I plant my globe amaranth

How to plant in a container


To start, let's check the fundamentals. The basic layers for a plant in container are as follows.

How-to-plant-in--a-container

The layers in a pot


  • At the bottom a drainage layer, this will help the water flow properly and avoid water clogs and damage to the roots because of this.

  • Then there is a base layer of soil. Here is where most of the new roots will grow.

  • On top of that, it goes the root ball of the plant, all surrounded by more of the new soil. The root ball is the main mesh of roots from the plant, usually all what was on the starter pot.

  • And finally, the top layer made of mulch. The mulch is just a protective cover over the soil. It is good to retain moisture, reduce erosion, provide nutrients and suppress weeds.


With this knowledge, we are ready to set our plants in their pots.

What you will need


How-to-plant-in-a-container-10

A good pot and gravel for drainage


  • Gravel or other material for drainage You can use broken pottery, washed seashells, packing peanuts and many others.

  • A proper sized pot Not to big, not to small. Even if the plant will grow a lot, is best to repot several times in gradually bigger pots, than to put in a huge pot from the start.

  • Good soil Depending on your plant different soils will be more recommended. However, black, rich in organic matter soil usually works well with most plants.

  • Much Peanut shells, dried leafs, shredded or chipped bark, straw, etc.

How-to-plant-in-a-container-9

Black, good soil is best


Setting your plant in the container


  1. First, If your plant just came home from a greenhouse or a garden center far away with a different climate, let it rest for a couple of days. This will help it adjust to its new environment.


  2. Water one day before or in that morning to assure the plants have plenty of water and also because working with moist soil is much easier. Remember, the soil must be moist, not damp.

How-to-plant-in-a-container-8

This hole was too big, so I got some wood sticks in to help


  1. Rinse or scrub the container to get rid unwanted materials, then check to make sure it will have proper drainage. If the hole is to small, make a new one, if it is too big, put something to partially obstruct it.

How-to-plant-in-a-container-7

Good draniage is essential


  1. Add a layer of drainage material. Between two to six centimeters should be enough, but adjust it depending on the size of your pot, and remember to make it even.

How-to-plant-in-a-container-6

Add enough soil to have a good base


  1. Add the soil, compost, or potting mix, to have the soil base. Put enough soil to assure the plant will be at the proper height. Some plants, like strawberries, have a depth they like to be. For those make sure the amount of base soil will not make the newly potted plant be deeper than it was in the original pot. Others, like tomato, prefer to be buried deeper than they were, so they can grow new roots from the stem.


  2. If you are going to add some fertilizer you can add it in this layer. But make sure it is slow release fertilizer, to prevent it from burning the growing roots of the plant.

How-to-plant-in-a-container-5

Hold the plant firmly, then carefully turn upside down


  1. Now the tricky part, get the plant out of its old pot and into the new one. To remove the plant from its old pot, slip your hand over the top of the pot, holding the plant's stem between your fingers and the soil with your hand, then turn the pot upside down. Give the old pot a little pat and gently sake it and pull it up until the root ball is out .

How-to-plant-in-a-container-4

Untangle the roots


  1. At this point, you will be holding the root ball. If the roots encircle the plant, very gently try to loosen up some to untangle them a little. This will help the roots to spread out in their new pot and prevent many problems later on. If the roots are too tangled together you can snip a couple or slice about a centimeter of the outer layer of the ball.

How-to-plant-in-a-container-3

Place the plant in the pot


  1. Carefully place the plant on its new home, make sure is centered and leveled, then spread out the roots a bit more.

How-to-plant-in-a-container-2

Add soil around the roots and press to get rid of excess air


  1. Then add the rest of the soil evening it out and pressing the soil against the plant, just enough to eliminate any large air pockets without compressing the soil.

How-to-plant-in-a-container-1

Good soil will make its own mulch


  1. Add a final layer of much if you want to, the plant with sure appreciate it, although is not completely necessarily.


  2. Finally, water thoroughly, until water runs out the drain holes, to moisten the roots and to settle the soil.


And there you have it, the plant is set.

How-to-plant-in-a-container

Take good care and it will live happily


Keep it in place with plenty of light but away from direct sunlight for a couple of days If you can. Also take extra care of it for some time to make sure your plant adjusts to its new house. And remember, plants should be moved into larger containers as they grow. So you might need to repot them later, maybe every couple of years or less depending on the plant.


Monday, 17 January 2011

World garden blog carnival. Gardening for the new year

Time for the carnival. I hope we get a lot of nice posts to showcase.

I have a lot of projects coming for this year. And one of the most important is my grape.

My-blueberries-and-some-autumn-color-in-my-garden-2

My grape fading into winter


I have always wanted to grow a grapevine in my garden. But, I always thought it would not happen until I got a house for myself. When I started my little garden here I considered buying one for one moment, but then I thought there would be many problems when caring for one in a small balcony and I kept coming up with excuses not to do it.

Even when growing on a small container grapevines can spread quite far. And since I don't have a permanent house yet, I didn’t wanted to risk having the grapevine climbing all around a balcony and then having to move and loosing all the effort from that year.

my-grapevine-4

I hope I can train my grapevine like this


But, one day when I was at a library looking at gardening books (And I mean looking because I cant read that much japanese, so I usually only look at the pictures) I saw a very nice photo of a grapevine growing on a small pot, all coiled around itself and with a lot of fruit hanging. The pot could not had been more than 15 cm tall, and the hole plant looked under a meter, but yet it had a lot of fruits. It had never occurred to me that was possible! Back in my country I have always seen it growing big, even when in a small pot. I don’t know why I didn’t thought of it before.

my-grapevine

I already set it up for starting


I looked around more in the Japanese books and the same layout was in almost all of them. They all explain more of less how to do it. I guess in Mexico we don’t try because we have the space. But here in Japan, where space is a luxury some times, growing mini grapevines is common. That is the good thing about traveling, it helps expand the horizons and think outside our own box.

my-grapevine-2

Just have to keep the branches in order
and make some good pruning


So having no more valid excuses, I got my grapevine. I also got a nice planter and some bamboo sticks to make the frame. The plan is very simple, let only one or two branches grow, keep it coiling around itself and prune a lot to keep it tight. Hopefully next year I will have it set and I will get some nice fruit our of it. The original photo I saw in the japanese book only had one level of "circling", but my planter is quite big so I think I can get away with a "two stories grapevine".

my-grapevine-3

By the end of the year it should be ready


Oh and also, some time later I saw them in person. They had a couple in the garden center. I have even seen a bonsai grapevine with some fruit too. That should teach a lesson about thinking out of the box.

Now is your turn, What are your gardening plans for this new year?


For the blog carnival, please input the link directly to the post you are submiting in the widget below. Just click the blue button that says add your link.

Remember it must be a post about what do you plan on doing at your garden this year, maybe about one particular plant you want to have, a renovation you will do, a special patch you will grow, a new gardening technique you will give a try, or any other project you have prepared for this new year.

If you have more questions about the carnival or you want to add a link to this page click here to go to our carnival main page. There you will find more information and some resources you can use.

Or if you want to see past carnivals click here.

Also, add a comment if you like and let us see what your garden is bringing this new year!


Friday, 31 December 2010

Happy New year! and the best gardening for 2011!

One very interesting thing I discovered here in japan, is that seals are a very big thing. They are very used, mainly as signatures, but I have seen them applied in many other ways.

So, since I was trying to make an identity for my garden and the blog, of course I could not be left behind. I looked around but having them made was too expensive for me, so decided to make one myself. I browsed around some stores and they had a lot of do it yourself tools and material for making them. It was very easy and cheap enough.

Happy-new-Year2

My little garden in japan seals!


To make them I just printed the image and pasted to the seal rubber temporarily for reference, then I carved it with a little knife cutter. I did two of them with different designs that go together, that way I was able to have two colors on it. It takes some good alignment and to wash it every time is used, to keep the inks to stain each other. The result is a bit rough, but I like it. I already use it for the mint labels I gave away to my friends at tokyoDIYgardening.

What do you think?


Now on a different topic, how about another blog carnival for starting the year?
I think most of you are having a new year resolutions post. So I think it would be a good idea to put them together.

Just a post about what do you plan on doing at your garden this next year, maybe about one particular plant you want to have, a renovation you will do, a special patch you will grow, a new gardening technique you will give a try, or any other project you have prepared for this new year.

I think between 15 and 20 of the month will be great, what do you think? Please let me know on the comments.

Happy-new-Year

Happy new year!


And so we reach the end of another year! I hope It has been a great year for everybody.

Keep posted, I have so much more planed for next year, many projects and ideas I want to try.

Happy New year, Wish you the best for 2011!

Wednesday, 15 December 2010

Coldframe V2.0

I had been wanting to upgrade my coldbag, because even it works really nice, the little seedlings could have even more advantages. In particular I wanted something that would let more sun to the little seedlings. 

coldframe-v2-3

The new seedlings are doing great


So I started scavenging for materials to use. I didn't wanted to build one out of wood and glass, because my goal was keeping the portability and cheapness of the cold bag. I considered using a cardboard box, but I knew that on the first rain, or with the water pouring out from the little started planter, I would end up with a cold frame soup in no time.

Then I remembered that here, at some grocery stores, they always leave all the plastic boxes from the food, all cleaned and ready for people who need them to pick them up. So, one day I went grocery shopping, I took a small look at their little recycle corner. There I found the perfect box. It was a deep, thick expanded polystyrene box, in perfect condition.

coldframe-v2.0

Building the new coldframe


The build was very simple.
  1. I carved a small window on the cover of the box to leave only a frame. Being sure to leave a small edge

  2. Cut apart a transparent plastic bag to have two sheets to use as "glass".

  3. I taped one of the transparent sheets to the edge I had left and cover the hole in the frame.

  4. Turn around the lid and tape the other sheet from the inside. This will make the window a sandwich of plastic, air and plastic.

  5. Finally use little pieces of tape to cover any hole in the borders. The more airtight the better

I used two plastic sheets, one in each side of the cover. That way the insulation will be much better. The air in the middle will work as the insulator. The same way a double glass (double frame) windows work better than a single glass window. 

So far it has worked beautifully. The little seedlings growing there sprouted in no time, they have even reached the size of the ones in the coldbag already.

coldframe-v2-2

From back to front: Bekkana, Spinach, Komatsuna, Lettuce


The first to grow were the Bekana and the Komatsuna, then the spinach and finally the lettuce, coriander and the chives. I was surprised the chives and the lettuce sprouted, they are supposed the be past their season. They must really be very cozy and warm in there. I hope they all keep growing nicely, I will post more about how they develop later.

Now, the only setback is that the new coldframe has such a good insulation that every morning the inside screen appears all damped because of the condensation. I have to dry it a bit and clean it up so it will let the sunshine in.

I recommend anybody who wants to have a nice cheap planter at their homes to use old expanded polystyrene boxes. First, because is much better to reuse them than throw them to the garbage. Second because they are great planters. Expanded polystyrene is a great ecofriendly material, even though it certainly doesn’t look like it. It is a great insulator, and has an amazing endurance for such a light weight. It definitely won't mold and It will not degrade easily, so I can last lots of gardening seasons.

coldframe-v2

The first seedlings sprouted in 4 days


One more thing about polystyrene. It is highly recyclable, but it very hard to do it because it has to be sorted away from other materials, which is a very troublesome task. This causes a big problem because it is usually thrown with normal garbage and pollute instead of being recycled. So, if you can rescue some polystyrene from going to the dumpster, and give it some more years of use please do.

Friday, 19 November 2010

Using banana peels as fertilizer for container plants

To ensure all the flowers in my garden will continue to bloom nicely I decided to add a little of fertilizer. But, because I did not wanted to spend much money on specialized fertilizer and also because I prefer to use more natural methods, I choose to go cheap and simple with some good home made plant food. Lucky for me I always enjoy having banana milkshake so I have a lot of banana peels available, great for what I need.

banana-peels-fertilizer-1

One banana shake fertilizer order coming up!


Many gardeners know the great benefits of using banana peels in the garden as a fertilizer. They are great for helping roses (I used it successfully with my little yellow rose before) and many other plants get more flowers. Bananas are rich in phosphorus and potassium, both of them important macro-nutrients for the plants. Potassium in particular is the responsible for the new formation of flower buds.

The most common method of using them is just cutting them in chunks and burying them around the fresh soil for the plants. However, for us container gardeners, it gets a bit more tricky. We cannot just stuck some peels in our containers because, in such a little space, there is the risk that the decomposition process of the peel would damage the roots of the plants.

banana-peels-fertilizer-2

Mix the blended peels and eggshell with soil and let it rest


So here is my little trick, since I am already having a banana milkshake, I also make a shake for the plants. All you need to do is toss the leftover peels into the blender, add a little of water ( I sometimes use the left over water from washing rice, it helps even more), and if you want to give it an extra punch, throw in a couple of leftover eggshells. Blend until smooth. When it is done you will end with a not so good looking shake, but the plants will love it. To help the plants assimilate it even better, you can mix it with some soil and let it rest a week.

banana-peels-fertilizer-3

After a week you get some nice potasium rich soil


I would recommend to be careful with the recipe. Remember, it is fertilizer. Judge well how much to feed to each plant. I did this wrong by mistake last time and I ended up having too many flowers on my peppers, so many that they only gave one single pepper for the whole season.

On I different topic, I have been having such a good response on the blog lately that I want to give something back. I am planning on organizing a blog carnival for the end of the month. Blog carnivals are great, they help beginner or unknown bloggers get discovered, and also help more established blogs get new ideas and inspiration.

I haven't decided on the topic though. It is between, posts showcasing the favorite plant of your garden in that month, or a roundabout of how everything is going on in your garden, sort of like my little monthly update.

Which one would you like to participate in? Any other topic you prefer?

Please let me know what do you think in the comments.

Have a great weekend!

Friday, 12 November 2010

The seeds sprouted, the coldbag works!

Today, I found some komatsuna and lettuce seedlings already showing enough strength. I plant them last Saturday afternoon and the first ones started poking out from the soil the morning of Wednesday. I'm very surprised they sprouted so fast, I thought they will take at least until next week.

Seeds-sprouting-3

The first sprouts from my coldbag!


I am planning on letting them a bit longer on the coldbag, until they get some more strength. Although not much because they are already fairly tall. I don't want them to reach the top of the bag and get hurt.

Seeds-sprouting-1

Komatsuna is so easy to grow, and very tasty too


The only ones left to come out are the chives. I wonder if they will come out at all, because their season has been over for a while. I'll keep my hopes high though.

Seeds-sprouting-2

Komatsuna and lettuce seedlings


Also here is a picture of the pumpkin seeds I will try next year. I took them out of a little pumpkin I carved for Halloween. I have no idea if the seeds are viable. Sometimes the products they sell are hybrids, so even if they do sprout and grow into a full plant, I have no idea if they will give any new pumpkins at all. It is going to be a fun experiment.

Seeds-sprouting-4

My pumpkin seeds drying with the sun


For now, there is only step one, letting the seeds dry, then store them on one of my seed jars until next year. I hope they succeed.

Wednesday, 10 November 2010

My attempt at having a coldframe

Because the weather is getting a bit colder, and I still want to sprout some last seedlings. I decided that It would be a nice project to have my very own cold frame. Of course that with the limitations on space and resources of my little balcony garden, I can't have a proper cold frame, so mine would have to be a cheap and easy knock off version.

To build it I just decided to go with simple and cheap materials. I went to the 100yen shop (the equivalent of a dollar store in japan) and got a plastic fabric bag for clothes, also used a tray that I had bought before from the same place. One more thing, because the fabric bag still lets some air go trough I added an extra layer of plastic to avoid any heat to escape by convection.

My-coldframe-3

My new coldbag!


The good thing about using the tray is that I can easily move the whole contraption inside in at night, if I want them to have an extra amount of heat.

My-coldframe-4

Getting ready to set some new seeds


I got some seeds ready in the colorful started pots from the strawberries, and now just let them be and wait.

My-coldframe-2

All set up, tight and tidy


It seems to be working well. The temperature inside has been one or two degrees higher than outside. Hopefully the seedlings will sprout soon and I will be able to have them ready before is to cold.

I decided to set three different kind of seedlings in it. Komatsuna and lettuce, to replace the ones I already finished on my big lettuce planter, and also chives because I think my garden was missing something from the onion family.

My-coldframe-1

They get a nice amount of sun, to make sure the temperature raises


Hopefully it will work, I will keep posting to let you know how it goes.

Saturday, 30 October 2010

My Seeds

Part of the fun of having a garden is all the planning involved on it. Being able to decide what we would grow next and where it would go is very exciting. One of my favorite parts is choosing among the infinite varieties of plants to grow.

my-seeds-2

My seeds box


I always get carried away imagining how it would be to grow this and that, and I always want to add a new plant to my garden. The only problem is that here in my little garden in Japan, we only have the very restricted space a balcony garden can provide.

Of course, this didn't stop me when getting seeds. Adding the ones I brought from Mexico and the ones I got here, now I have ended up with way more of what I would be able to have. I really doubt I can fit even a quarter of all this in my little garden. So, I am sure there will be very tough decisions to make next year, when I would have to choose what to sow.

My-seeds

I like to keep my seeds in jars instead of envelopes


Here is a peek into my seeds box for this year. That way you can help me decide.

  • Chives. I just got this ones, I will sow them this week, hopefully they still can catch the season.

  • Thyme I cave in to my impatience and I bought the plant, so probably I won't need these after all.

  • Alyssum I have the plant too, but I doubt it will stand the winter, so they are my back up plan.

  • Cactus A little bit of Mexico's flavor, but I have three bags, so I will give some away.

my-seeds-3

Komatsuna, Cilantro and Chile de arbol


  • Chile I have chile serrano, chile ancho, chile guajillo, chile pasilla, chile poblano, chile de arbol y chipotle. It will be impossible to pick only one.

  • Zempasuchitl The Mexican marigold, with a much stronger scent, I like this flower and it is very good for the garden, so this one is a keeper.

  • Epazote An annual herb, good for condiments.

my-seeds-4

Alyssum, Cactus and Lettuce


  • Komatsuna The one I am growing now is doing very well. So I think it can be a keeper for next winter as well.

  • Cilantro Must have for Mexican food.

  • Beans The beans I had this year didn’t do well. Even when they flower they did not got fruit. I brought some from Mexico, hopefully they can do better.

my-seeds-5

Chamomile, White flower and Beans


  • Lettuce Another of my winter vegetables that is going great.

  • Chamomile This one might go well on a planter with the Epazote, It would be a nice addition to the herb corner.

  • Unidentified white flower I picked this one up from a sidewalk in shibuya, no idea what it is.


Beside all of this, I want to grow some pumpkin, some tomato, possibly blueberries. Also, I know there will be more plants that I won't be able to resist next year.

It is definitely too much for me, anybody want some extra seeds?

Saturday, 4 September 2010

How to make a division to separate plants on a container

Today I moved around everything in my garden. I got several new pots for this season crop so I'm trying to make more efficient use of my little garden space. One of the projects I wanted to do to accomplish this was changing my mints to a new pot. Their current one is very wide, which is great for the plants, because they have space to spread and give more branches, but no so good for me because I have way more leafs than I need and the pots take too much space.

So, I decided to move them, and I got a very nice wooden pot, perfect size to fit both and just the right depth. But, there is one problem, mints spread very aggressively, they compete with everything around them, including each other. This means that if I simply put both plants on the same container over time I might end up with only one, the strongest one.

To prevent this I needed to make a division that would keep each mint on their side of the pot. I used a old plastic folder and used a very simple procedure.

Here is how I did it

Materials needed


My garden 0044 September 02, 2010

A very simple project to divide your container


  • The container you want to divide

  • Recycled paper

  • Rigid plastic sheet

  • Scissors

  • Something to write with (a pen, marker, etc.)

  • Scotch tape (or similar)


Step 1: Decide how you want to make the division


My garden 0045 September 02, 2010

Plan how to divide


Depending on your plants, you will need to decide how you want to separate them. You must determine if one requires more space to grow, if you want an asymmetric layout or if you are setting multiple divisions. For this part you can use the paper sheet and work around how you want it to be at the end. In my case I wanted a single middle division to give each plant equal space.

Step 2: Mark the shape


My garden 0046 September 02, 2010

Mark the borders


Once I have decided how I want the division. I just set the paper in that position and stretch it very good to make it fit exactly, then I mark where it meets the sides of the pot, this will give you a mold of the shape you need.

My garden 0047 September 02, 2010

You get a paper mold


You can also make folds to mark the position, but is much easier to use a pen, also you can do it directly with the plastic, but if it is too rigid, you will have problems setting it into place.

Step 3: Cut the plastic


My garden 0048 September 02, 2010

Cut the plastic using the paper mold


Using the paper as a mold cut the shape you need, then fit the plastic in the pot, if there is any irregularity correct with the scissors or cut a new plastic.

My garden 0049 September 02, 2010

Test if it fits and trim any excess


Step 4: Set the plastic in place


My garden 0050 September 02, 2010

Set in the pot


Once the plastic fits nicely in the right position secure with some tape, if you want to assure none cross you can use extra tape to fill any gaps.

My garden 0051 September 02, 2010

Fix it into place


Step 5: Fill with soil and put the plants in


My garden 0052 September 02, 2010

You are done!


Once the division is put you are done! You can just set your plants into place and they will each stay on their side (although, you can check now and then in case one manages to cross)

My garden 0053 September 02, 2010

You can have a diferent type of soil on each side


This is very simple project and can be done in a couple minutes. I hope it helps you to manage your unruly plants.


My garden 0030 September 04, 2010

Here are the mints, happy in their new home

Related Posts Plugin for WordPress, Blogger...