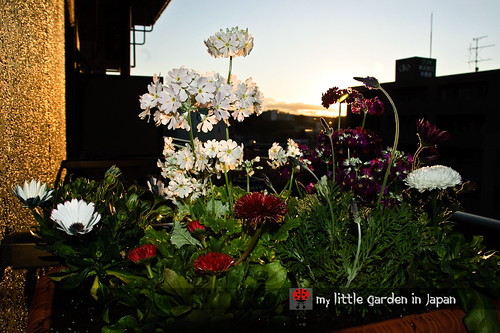
Last week I got a couple more plants to fill the last flower box together with the baby primrose, the lavender and the chocolate cosmos. As always I got a bit carried away and got more than I could fit, but I don't have any regrets. The new flowerbox looks amazing! I hope it will keep growing nicely all spring.
More flowers for my garden!
Unfortunately, a bit before I had a chance to set up the new flowerbox, we had a night of very strong winds (one of the drawbacks from living in a sky rise). The wind knocked over the chocolate cosmos and broke the plant. It wasn't a fatal wound, but I think is better to give it some time to recover before transplanting it. So, only the lavender and the baby primrose could go in the new flower box.
I got a couple more nice flowers to live along in that planter. I decided to go with a couple of perennials this time, just for a change, but I still tuck a couple annuals along too.
- Baby primrose. Last time I had gotten the white one, but they look so great I could not resist and got a purple one too.
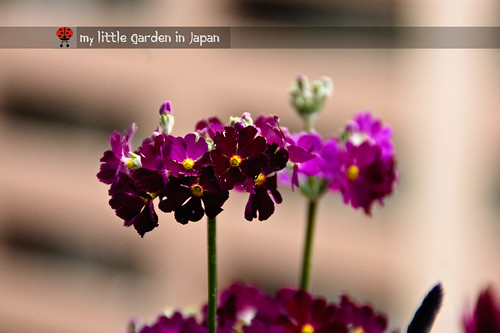
fairy primrose, it looks like little butterfly wings
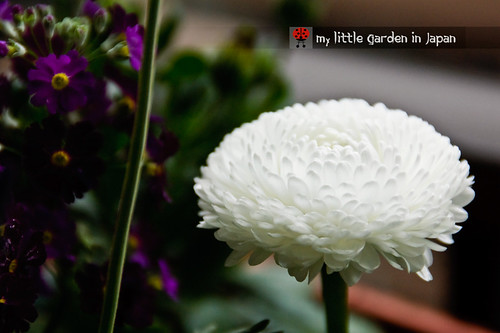
- Daisy. I am not sure of the variety, I could not find a translation to english, but I like this kind. They look like little pompons when they are about to open. I got a red and a white, they look very nice together.
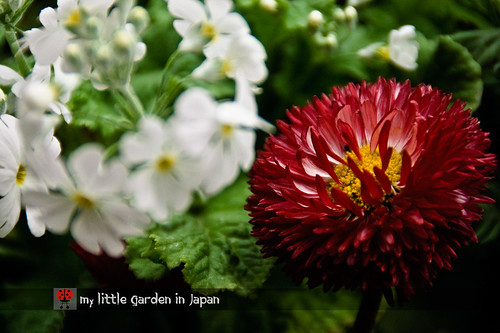
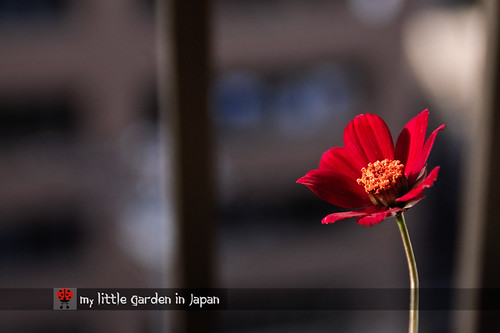
This red one is one of my favorites
I hope the bees will be happy this spring
- Osteospermum. I was not sure if growing three perennials on the same pot would be good, because I don't want to compete among each other when they grow. But, how could I resist? the flowers look amazing. I will trim the roots often if I have to. I just hope it blooms for a long time.

I also got a purple osteospermum, they look great
Spring is almost here
Having the new flowers blooming makes it feel so much like spring is here already, hopefully they will grow well in there. I still have to find a place for the chocolate cosmos, but I still have to make some more planning for that.
Is almost the end of the month and I didn’t realize I have not done the monthly update. I think is mostly because not much has happen in the garden this month. The plants are starting to wake from their winter slumber but still have a bit until any big display happen.
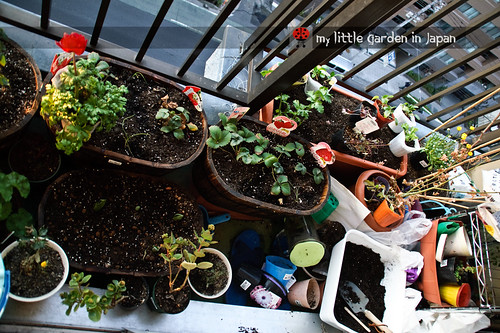
The balcony is pure chaos mess, I need to fix that for spring
- The balcony is a mess. I will sort it out this month, there is a lot to do for the coming spring.
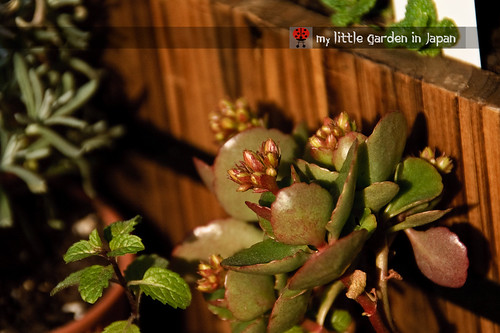
- Most plants have been the same. The herbs are reviving and a lot of them are getting some new growth. The Rosemary keeps blooming like crazy. I am surprised the Aloe and the Maguey have it too. I was expecting them to struggle to adapt since they come from the hot Mexico, but they seem to be doing just fine.

The maguey took winter very well
- The tulips keep on growing. I think they will get very tall soon.
- Most vegetables seem to have stunted, probably because I didn’t had a cover for them during the winter. Hopefully they will start growing now that the weather is better, If they don't I can always sow more.
- The strawberries are very beaten from the cold, but they seem to be hanging there enough. Also the blueberries start to have swollen flower buds.
- For the flowers, the Kalanchoe is preparing her spring display, and all the flower pots seem to be blooming nicely, even the one planter that had been shy, with the help of the banana milkshake it seems to be recovering already. I will write more about that later. There are some new flowers on the garden, but I will introduce those on their own post.
The Kalanchoe is ready for spring
- The rest of the plants seem to be ok. The only casualty of this winter has been the ornamental peppers. They didn’t make it this time, but is ok because there are a lot of new peppers coming.
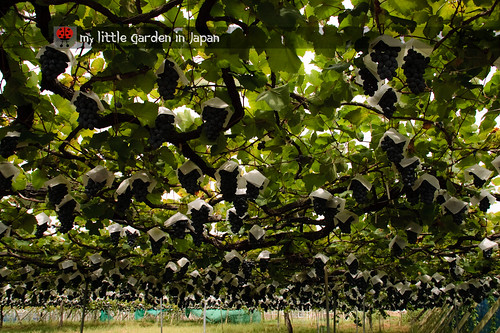
Spring is almost here, and to take the most advantage I have prepared a series of how to's for all things gardening, with special tips for all beginner gardeners and for those of you who only count with very little space for growing. To start, I want to post about how to grow a grape vine in a container. I had a lot of great feedback on the day of the world garden carnival with my post about my own grape vine, and also I got a lot of mails about people who wanted to know more about how to grow them like that.
Is very easy to have your own grape vine
Growing a grape in a pot is very easy to do and also very rewarding. There is just a couple things to consider: You have to make some planning and later keep the plant in check or else it can grow wildly and get out of control. Here is how I do it. I hope you find it useful!
This small tutorial contains the basic care of a grapevine. Even if you are not growing in a container you will get a lot of benefits from following it
If you have further questions don't hesitate to leave a comment, send me a mail or a tweet.
How to grow a grapevine in a container
First a little check on the plant. Grape vines are very hardy are perennial plants, very nice and easy to grow in containers. They forgive a small dry spell and they can do well on poor soil. If they are trained properly they can take very little space. Grapevines are great for making a natural barrier or providing some extra roof in a pergola outside. And of course, the best of all is that they give very delicious fruit! There are hundreds of varieties of grapevines, and they can take a very wide range of climates. So chances are, if you want to grow them, there must be one perfectly suitable for you.
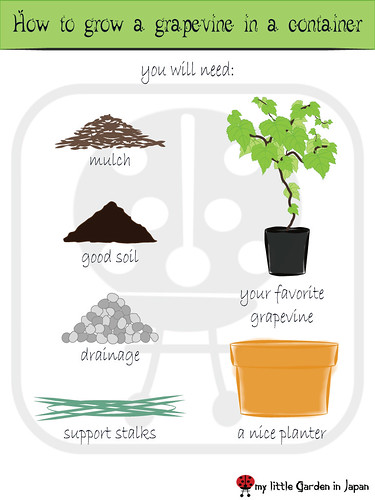
You will need
One thing to remember though is that new grapevines take a little time to give fruit. So if you want to have one in your garden make sure you are in for the long haul. Grapes give fruit on second year wood. This means that the new branches that grow one season will be the ones giving fruit next season. Also, is important to remember finding an appropriate site to grow your vine; Grape vines appreciate having full-sun. Having a lot of sun will help them bare more fruit.
Choosing your grape
Before anything you have to choose the type of grape you want to grow. Be sure to pick one that is adapted for your climate, that way the plant will have a much better chance of growing nicely. To make the picking of a variety easier, you can ask yourself a couple questions. What do you want to do with the vine?. Are you are after the fruit or just the leaves? What will you do with the fruit? Do you want to have a red or a green one? Once you have decided on those things you can ask in your local nursery or garden center for one that matches your description or just do a quick search online.
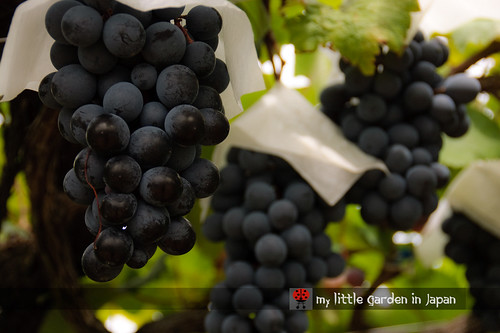
Pione grapes from japan
In my case I have a pione, it is a seedless purple table grape, it has an amazing flavor and the fruits get to grow really big. It is one of the favorites to enjoy here in japan.
The best time for buying new grape vines is around autumn, right after the harvests. That will give the plant a chance to grow its roots and get established in its new house before the dormant period.
Step 1 Planting your grape and the initial pruning
Now that you have your grape is time to plant it on a pot. If you need some instructions to help you, be sure to check the post about how to plant in a container in here. The process is basically the same as with most common plants. Get a nice layer of drainage for your container and some rich black good soil. Grapes can take having poor soil, but they do much better if they are feed properly. Be sure to separate the roots when you are planting. Grapevines like having a chance to stretch their roots, this will help them develop and settle much more quickly. Remember to put a layer of mulch to keep the weeds away and keep the temperature of the pot balanced.
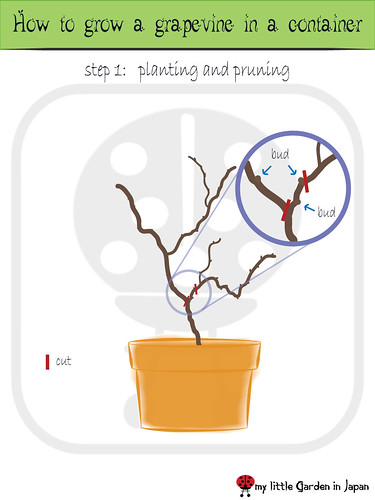
When your grape is set, it is time for a little pruning
Once you have planted your grape keep it growing freely until the season ends. This will allow it to grow strong roots and establish in its pot. If you got it early in the season it might get a bit messy with all the new growth, so you can do a small pruning during summer to keep it small.
When winter arrives your grape will drop its leafs and enter a dormant state. During this period it will need less resources, so be sure not to over water. By late winter, after the big frost but a bit before it starts growing again, it is time to the first big pruning.
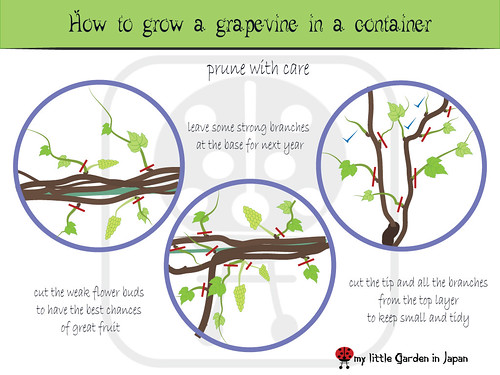
The best way to prune is to make a diagonal cut away of the bud, just a little over the same. Also, you can cut right into the middle of the joints of the cane. This last technique can work very well, but you have to make sure to avoid damaging the bud, which is sometimes tricky.
The goal here is to trim your plant so only the two lower healthy buds remain. The bud is a small protrusion growing out of the trunk. It looks a bit like a mole or a small pimple growing from the bark. From these is where the new branches will grow.
Step 2 Building support
To help your vine grow neatly and under control you have to provide a structure for the vine to climb into. A sturdy trellis or wood frame will work well. You can form a small arch, a circle, make a stair shape, etc. There are many possible shapes you can try, let your imagination guide you.

Be sure to give it a strong structure for support
Depending on the size you grow, the trunk plus the leafs and the fruit can get a bit heavy, therefore the only requirement is that whatever structure you have must be strong enough to hold the weight of your vine. Also, make it with something that will last many years, since you will have it growing there long time.
Step 3 Training your vine
The next spring after you did the heavy pruning, one main branch will develop from each of the buds available. The task here is to keep them growing on the shape you want. You can progressively tie your vine to the trellis as it grows, to maintain the form. Keep it on check regularly, especially during spring, because the vine can grow very fast.
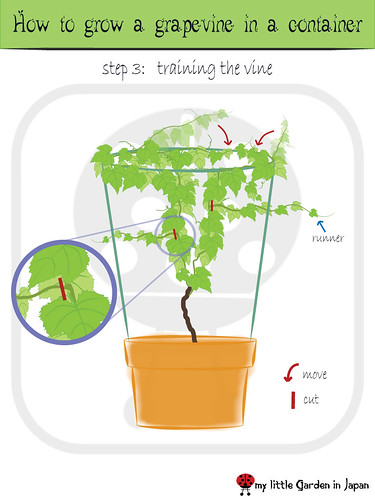
Keep your vine neat and tidy
Because of the space restrictions on a container is best to keep only one or two branches growing (more if your container is big enough) thus is best to keep only the stronger branches. Prune away any runners that sprout from the core canes to give all the strength to the main vines. Once that your grape vine has reached the size you want, you can cut the tip of the vine to prevent it from growing further. The best fruit is given approximately from the sixth to the twelfth fruiting bud, so you can use this as a reference for the size of your grapevine.
After the season ends, and the vine enters its dormant state once more, you will have a skeleton that will be the main structure of your plant.
Right now, this is the step my grape is in. It can be a bit of effort to keep the vines in check, but I am sure the results will be worth it.
Step 4 Setting the cycle
This is the most crucial part of growing a grape vine. In order to keep the plant healthy and giving the most fruit over the years to come you must prune it periodically. Also, since fruit is bare in second year canes you must prepare one new fruiting branch every year. To help you do this is best to make a cycle of renewal, where every year a couple new branches will grow and substitute the old canes from last season.
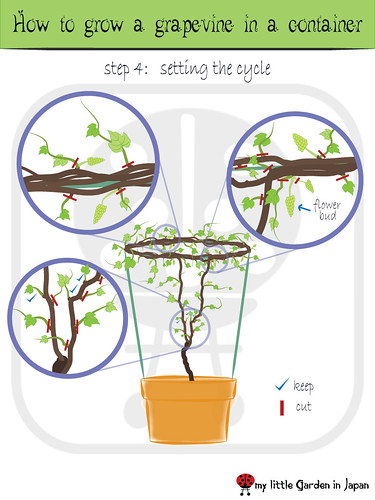
Making a cycle of renewal will guarantee the best fruit
For this, every year, you have to prune away all the new runners and branches that grow from the top canes. Leave only a couple strong and healthy branches growing from the base and train them to grow into your structure as you did the year before. Also, every year, at the end of the season, prune away the old wood. All of those branches that gave fruit that year have to be taken away. The idea is that those new branches will substitute the last season growth as the new fruiting canes for next year.
Once this cycle has developed, you can continue it for many years. That way you will always have the best fruit from your grapevine and it will grow into a very nice and healthy plant.
Extra tips for growing your grapevine
Make sure to prune it carefully
- During the fruiting season is a good idea to prune away any weak flower buds. This will help the plant concentrate its energy on the best flowers and give the best fruit. You should also take away any weak grapes growing in every bunch. There are a lot of possible grapes with every flower bud, if you take the smaller the rest will benefit and develop more and it won’t be noticeable.
- Grapes are amazing plants, they grow very easily even without much care, but is always good to feed them a bit of fertilizer around the spring to help them develop new canes, and also during the height of their fruiting season to help them grow more delicious grapes.
- Birds love having grapes as much as we do, so you might need to protect your grapes from them. Depending how much problems you have keeping the birds from eating all your fruit, you can use several methods. You can try small reflective material hanging or use a net to protect the vines.
- The new vines in a grape plant are very flexible and easy to manage; you can try making shapes or patterns while you are training them in their planter.
Now remember, this is only one particular way of growing a grape in a container. There are a lot of other methods shapes, techniques and arrangements you can try. I have seen grapes growing and covering a whole balcony and have also seen a little small bonsai grape. You should try to see what fits best for your needs, and don’t be shy to experiment. After all, that is what gardening is about.
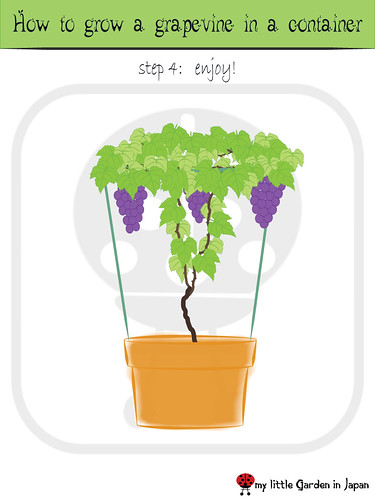
And that is how you grow a grape vine!
If you what to know more about growing grapes and other container gardening matters be sure leave a comment, send me a mail or a tweet.
Have a lot of fun growing your grape vine!
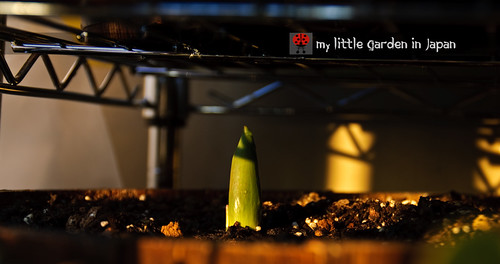
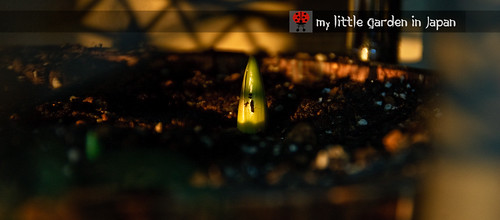
This week I had a better chance to sort out all my seeds and set up everything for the spring. I did the planning for how the planters will be and also a buying list. But when I was sorting the bulbs I noticed that the calla lily bulbs started sprouting already.
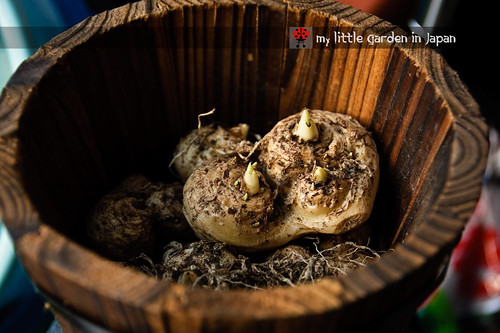
The little calla lily sprouts are even turning green
It happened as one of the consequences of me being sick. Winter here is cold, but I don't mind as much, so I hardly ever turn on the heating. That means inside has good temperature for storing the bulbs. I had let them next to the window last month after collecting them. However, when I was sick, I turned the heating almost every night and I forgot to take the bulbs outside. So, they felt that sudden raise in temperature and decided to sprout. The biggest have a big enough start already, but hopefully they will be ok.
Now I have to decide what will I do. If I will keep them indoors until they gain strength and the weather is not as cold, or should I take them back out and let them fall asleep again. Any suggestions?
My plan for the calla lily is to grow it in the same planter as the tulips, so while ones grow in winter and spring, the others will do it in summer and autumn. Have anyone tried this before? I am not sure if they will be compatible.

My Calla lily blooming the past summer
Also, hope you noticed my internet tree got some snow on it. We finally had a couple snowy days last week but I forgot to mention on the blog until now. The plants did well, only the little peppers seem to have minded the cold. I wrote a little about it on my twitter. Follow me there for some tips and more about gardening. Also, there I write more about the things as they happen so it works a bit like a real time live news feed.
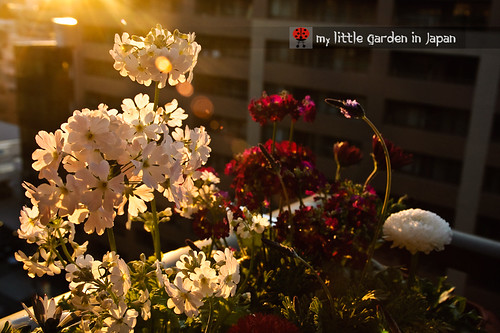
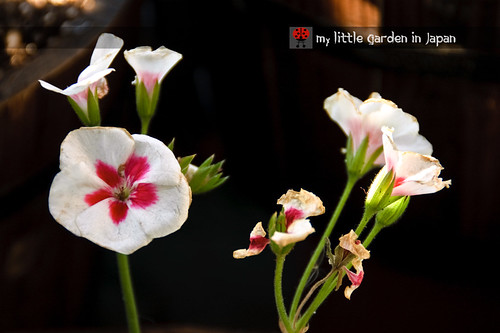
This past weekend I went to a trip to the garden center to get some fresh air after having being locked in the house from my cough. Because I already ran out of space on the balcony, I was planning to be careful and resist the temptation to buy anything. But they already started having a lot of the spring flowers and of course I couldn't resist myself. A couple of flowers came home with me, just in time for blooming day!
Three new flowers for my garden
Since I had to harvest all the komatsuna because of the aphid problem, one of my hanging planters got free. I was going to put a couple of the veggies seedlings in there but I decided that, since it is one of the upper planters, I should make it a flower box to match the others on that level.
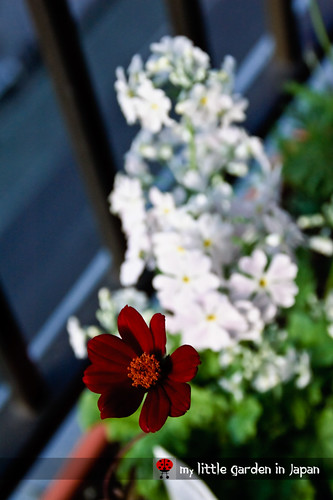
I really like the deep wine color on this one
Here is what I got.
- Egyptian lavender (Lavandula multifida) In here this kind of lavender is known as winter lavender. It is a favorite of little garden pots in Tokyo. I have seen it blooming all around this past months. I chose one that still has not open because I want to take advantage of the nice scent to attract a lot of butterflies in the coming spring.
- Fairy Primrose (Primula malacoides) I really like this one. It has a elegance that I can’t quite describe. The flowers feel a bit like the wings of a butterfly, and have a dusty color very similar to it as well. I think I will get another one, but in a different color, purple perhaps.
- Chocolate Cosmos This one was a great surprise. Last time I got flowers from my garden, I chose mint lemon marigold instead of this one because mint marigold is native from Mexico. So, now that I was forming a new planter, I decided to finally get it. The funny thing is that after checking around I found out that Chocolate cosmos is also native from Mexico. Small world for sure. Although, I should not be so surprised since most cosmos are native from Mexico and central America. Also, a sad note, chocolate cosmos is extinct as a wildflower, only the cultivated kind remains.
Small world, chocolate cosmos is native from Mexico
This time I got two perennials for one planter instead of only one as I had being doing for the others. Hopefully they will grow well. And if they give any problems my guess is that I can always transplant to a different pot.
The rest of the planter will be filled with some spring flowers. I still need to buy them, but I have a couple planed. I was thinking a couple pansies, but I already have those on the others. So I might pick something new to make a change.
Any recommendations?
One of the best things about blogging is being able to meet a lot of new people and make a lot of friends. I am able to visit gardens all over the world in a daily basis, and learn so much from the expert gardeners that take care of them.
Seeds from Diana from Kebun Malay-Kadazan girls
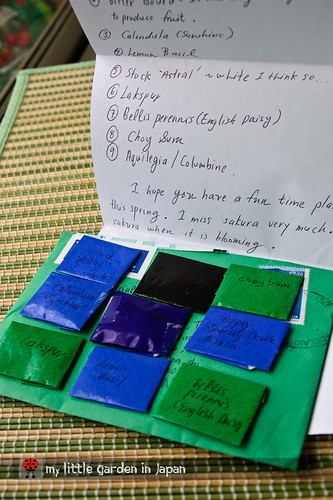
I got some seeds from australia
This past week I got a package with some seeds from my dear friend Diana from Australia. She has a blog called Kebun Malay-Kadazan girls. She has a very beautiful garden and gives a lot of great advices about growing your own food. I got the seeds as part of a contest she hold on her blog for seed week and as part of her participating on the project save the Bees. I was very lucky to be one of the winners. I got some poppy seeds, choy sum, basil, stock and others. I will be sure to prepare them as spring comes.
Thank you very much Diana. I will take a lot of care of the seeds and keep you posted on how they develop.
I was awarded the Mark's Veg Plot Chilli Award

Thank you very much Mark
I also was very honored in receiving the Mark's Veg Plot Chilli Award from my friend Mark from England. He has a blog named Mark's Veg Plot with fantastic advices on how to take care of your home vegetable garden. We have exchanged some mails, I was fortunate on helping him making tortillas, and got some good advices in return. Mark’s award makes me feel specially privileged because it is the first time he has ever give such distinction and also because he only granted it to four people.
Thank you very much Mark, I feel much honored.
Stylish Blogger Awards
Also, I was very flattered that I have being receiving a lot of stylish blog awards from several gardeners. I understand the stylish blog award works more as a recommendation, but I feel very proud that they consider my blog to be good enough to merit that thumbs up. I believe they consider carefully who to pass it on, and it feels great they think my blog to have such value.
Thank you very much, I really appreciate you picking me.
Jo from The Good Life
My Little Potted Garden
Rosie from My Garden Haven...A Fine Romance
Malar from MY LITTLE GARDEN
It is great how many people you get to know while online. I hope I get to know every one much better and that I get to make many more friends.
Thank you very much everybody for being my online gardening neighbors.
I apologize for my week without posting. I got sick this week and had to rest in bed a couple of days. It was just a cough, but it knocked me down enough. Now I am fine, and hope fully I will keep posting regularly.
Last summer I had a problem with my geraniums turning white all of the sudden. The leafs lose its green lush and after a while they dropped completely. It was a very surprising thing, since geraniums usually are very sturdy plants. I struggled to keep the plants alive and at the end only one of them survived.
The new leafs are all white
Although I never really knew what caused the disease, I thought I had learned my lesson. The surviving geranium plus a new one that I got didn't show any more problems and they even put a beautiful display all the rest of the year.
That was until now. Mid January the white and red geranium started to grow new leafs, but they all come out being white. The plant seems to be a little frail, but it is still growing, so I think it still has a chance of surviving. The funny thing is that, in contrast, the red geranium could not be more happy, It has thick big leafs and it is even starting to grow a new flower button, probably to bloom when spring comes.
The last geranium flowers of winter
I think the difference is based on the flowers. The white and red geranium still had flowers now, while the red one stopped blooming some time ago. The stress of having to survive in the cold plus showing that nice display of flowers is what made the white and red geranium more susceptible to getting sick.

I hope it can survive, it still has strength
Last summer doing some research didn’t get me anywhere. More likely the leafs turning white is a problem coming from the roots, but I am not sure. I repotted it, cut away the fading flowers and gave it a bit of new soil. Hopefully that will give it a chance. Anyone have any idea what it can be?
This is a post I have been wanting to do since long time ago. I wanted to show the gardening tools I use to take care of my little garden in japan.
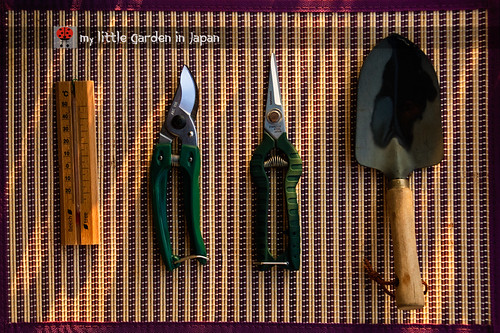
My balcony gardening tools
First of all, a little disclaimer. If you want to have a small garden, you don’t really need to have any tools. They do help make the work easy sometimes, but you can always get away without them. For bigger gardens they might be necessary, but for a little balcony like mine, no tools are really needed. You can always use your hands or whatever is available to get the job done.
So, don’t be afraid of starting your own little garden, no tools or anything special equipment required!
Having said that, here is the very small collection of tools I have gathered over my time in Japan.
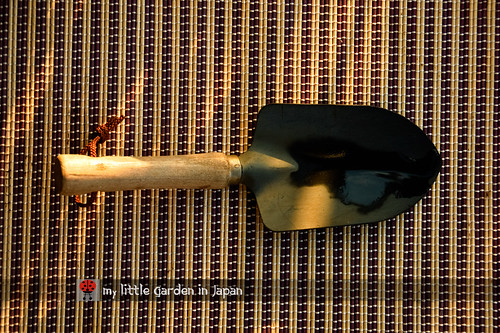
My little shovel
My shovel. A very basic component of the gardening gear. Good for moving soil around fast with out getting the hands dirty. I got this one very cheap at the dollar store. It is sturdy and has a wide spade, just what I need. I usually only use it when I need to move a lot of soil from one pot to another or when I need to mix soil. Otherwise I prefer using my hands. I like the very cool organic feeling of having a bunch of dirt on my hands. Also, using my hands gives me better control to handle the plants with the proper delicacy and finesse they sometimes need.

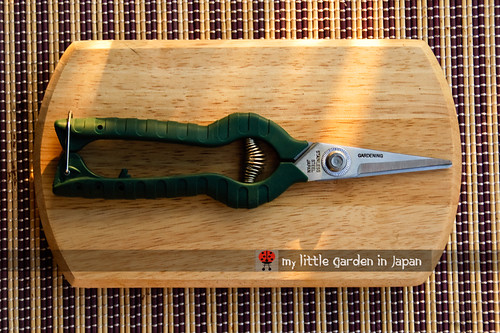
A set of gardening pruners can be handy
My pruner. This is the first big budget tool I got. I bought it because I wanted to shape around my grapevine with more control. I decided not to go with the cheap one for this because I consider it to be like a doctor scalpel, only for plants. I would not like my doctor to make an operation on me with a dull or bad scalpel, so I won't do it to the plants either. By the way, also remember: It is best to always clean your blades after using them. You wouldn’t want a surgeon to cut you with a rusty blade, so why do it to the plants? Also they will last much longer that way. They are way too expensive to be buying more every time just because we didn’t wipe it afterwards.

Is always good to know how is the weather
My thermometer. I only got this one because I wanted to see if the coldframe was really working or not, but it has become more handy ever since. It Is always good to see how the weather is doing. Being to know when is the time to sow some seeds or when to take some plants in. The on-line weather report might get it close, but will never tell you exactly how cold is out there in your little balcony.
Gardening scissors are good for the small jobs
My gardening scissors. The most recent acquisition. I used to do most of the beheading of dead flower buds, the harvesting of vegetables and some other fine jobs with the big pruners, but they always felt a bit too big for that task. It was hard to maneuver them between delicate leafs or in the inside of the branches. The pruners were just too bulky. So, when I saw this good set of gardening scissors for sale at the garden center, they had to come with me that day. They do get very handy. And now, since harvesting and beheading is what I do most, they have become my most used tool. Of course I still behead and harvest with my hands sometimes, because is just more fun that way.
What tools do you use on your garden?
Also, It was a busy start of the week for me. I have so many exams, and after that a lot of projects to finish. But I will still try posting as often as I can.