Saturday 29 January 2011

Aphids on my Komatsuna!

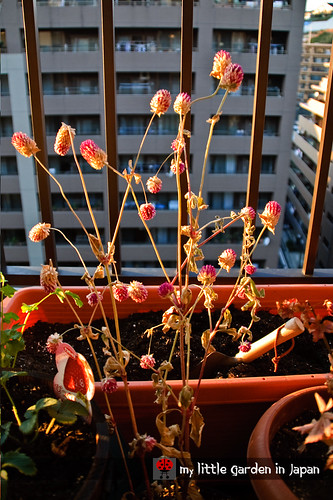
Aphids! they are back on my little garden. After I got rid of them last time with help from the ladybugs, I hoped they will stay away at least until the warm months, but no luck.

aphids-on-my-komatsuna

The komatsuna started turning orange


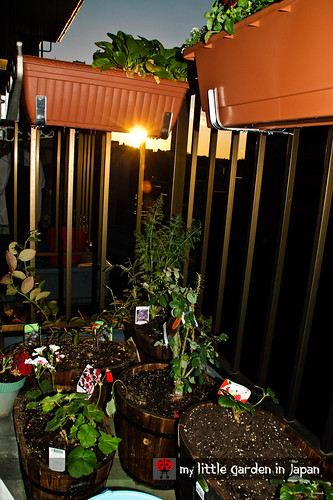
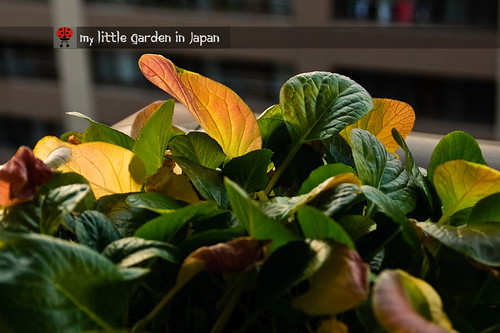
I had been noticing a couple of leafs on the komatsuna going brown and orange lately. Strange, but not that worrisome because the plants still looked healthy enough.

At first I thought they where just a bit dehydrated. . The wind usually takes away all the moisture on the upper planters and the days have been quite windy. So I just water them more and hope they will get better.

After a couple of days I noticed the leafs are still changing colors, so I blamed it on the cold. They are in the upper corner meaning they get extra wind and therefore cold. I wasn't worried because I have a lot of seedlings growing on the coldframe and also it will be time to change plants soon. I will have to harvest them anyways.

aphids-on-my-komatsuna-1

I wonder if I can still eat some after this, It still looks tasty


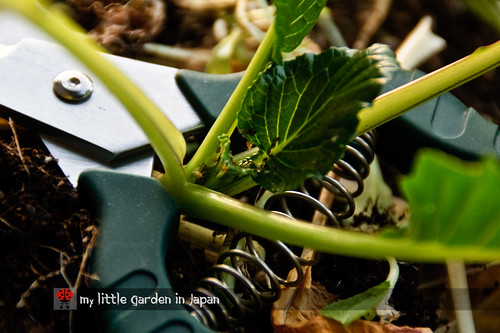
But then the other day, while I was sniping away some dead flower heads, I decided to take some komatsuna in to cook. There I found them. Aphids, a lot of them, going wild on the planter. Now I must get rid of them before they spread to all the other pots.

Lesson learned: I should have started paying a bit more attention from the beginning. I didn’t really check the plants until the end.

aphids-on-my-komatsuna-2

There are so many aphids in the komatsuna plants


Also, I found the guilty carrier this morning. I have been hearing some strange sounds on the outside lately but I wasn’t sure if it was just wind or what. Today I saw a big crow picking through the komatsuna. My guess is that the crow takes some leaves for making its nest and must have brought the aphids form some other place it visited.

Anyone with some recipe for getting rid of aphids?
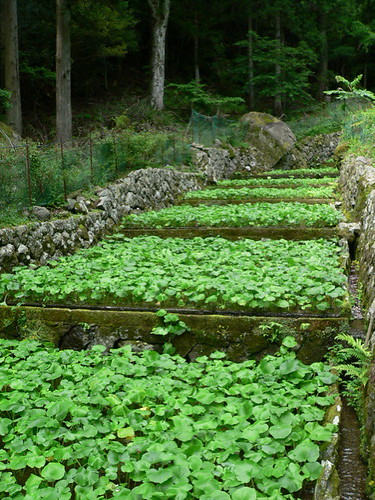
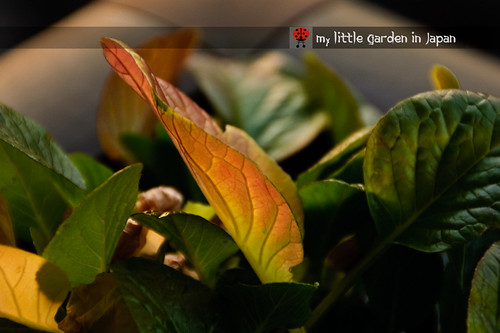
Wednesday 26 January 2011

How to set a plant in a container

Some time ago I had a couple friends ask me about how to start their own little garden. They had never really tried gardening beyond having a little indoor plant they bought out of a whim, so growing their own vegetables and mayor crops felt a bit too overwhelming. They wanted to know all the basics and I was very happy to answer all of their questions and get them started.

One of their first questions was how to set a plant to grow in a pot. I think this is a very good question, one that many people who is starting also have. So I decided to make a post about it. Here it is, a small introduction to container gardening for anybody wanting to start their own garden. I made it back when I plant my globe amaranth

How to plant in a container


To start, let's check the fundamentals. The basic layers for a plant in container are as follows.

How-to-plant-in--a-container

The layers in a pot


  • At the bottom a drainage layer, this will help the water flow properly and avoid water clogs and damage to the roots because of this.

  • Then there is a base layer of soil. Here is where most of the new roots will grow.

  • On top of that, it goes the root ball of the plant, all surrounded by more of the new soil. The root ball is the main mesh of roots from the plant, usually all what was on the starter pot.

  • And finally, the top layer made of mulch. The mulch is just a protective cover over the soil. It is good to retain moisture, reduce erosion, provide nutrients and suppress weeds.


With this knowledge, we are ready to set our plants in their pots.

What you will need


How-to-plant-in-a-container-10

A good pot and gravel for drainage


  • Gravel or other material for drainage You can use broken pottery, washed seashells, packing peanuts and many others.

  • A proper sized pot Not to big, not to small. Even if the plant will grow a lot, is best to repot several times in gradually bigger pots, than to put in a huge pot from the start.

  • Good soil Depending on your plant different soils will be more recommended. However, black, rich in organic matter soil usually works well with most plants.

  • Much Peanut shells, dried leafs, shredded or chipped bark, straw, etc.

How-to-plant-in-a-container-9

Black, good soil is best


Setting your plant in the container


  1. First, If your plant just came home from a greenhouse or a garden center far away with a different climate, let it rest for a couple of days. This will help it adjust to its new environment.


  2. Water one day before or in that morning to assure the plants have plenty of water and also because working with moist soil is much easier. Remember, the soil must be moist, not damp.

How-to-plant-in-a-container-8

This hole was too big, so I got some wood sticks in to help


  1. Rinse or scrub the container to get rid unwanted materials, then check to make sure it will have proper drainage. If the hole is to small, make a new one, if it is too big, put something to partially obstruct it.

How-to-plant-in-a-container-7

Good draniage is essential


  1. Add a layer of drainage material. Between two to six centimeters should be enough, but adjust it depending on the size of your pot, and remember to make it even.

How-to-plant-in-a-container-6

Add enough soil to have a good base


  1. Add the soil, compost, or potting mix, to have the soil base. Put enough soil to assure the plant will be at the proper height. Some plants, like strawberries, have a depth they like to be. For those make sure the amount of base soil will not make the newly potted plant be deeper than it was in the original pot. Others, like tomato, prefer to be buried deeper than they were, so they can grow new roots from the stem.


  2. If you are going to add some fertilizer you can add it in this layer. But make sure it is slow release fertilizer, to prevent it from burning the growing roots of the plant.

How-to-plant-in-a-container-5

Hold the plant firmly, then carefully turn upside down


  1. Now the tricky part, get the plant out of its old pot and into the new one. To remove the plant from its old pot, slip your hand over the top of the pot, holding the plant's stem between your fingers and the soil with your hand, then turn the pot upside down. Give the old pot a little pat and gently sake it and pull it up until the root ball is out .

How-to-plant-in-a-container-4

Untangle the roots


  1. At this point, you will be holding the root ball. If the roots encircle the plant, very gently try to loosen up some to untangle them a little. This will help the roots to spread out in their new pot and prevent many problems later on. If the roots are too tangled together you can snip a couple or slice about a centimeter of the outer layer of the ball.

How-to-plant-in-a-container-3

Place the plant in the pot


  1. Carefully place the plant on its new home, make sure is centered and leveled, then spread out the roots a bit more.

How-to-plant-in-a-container-2

Add soil around the roots and press to get rid of excess air


  1. Then add the rest of the soil evening it out and pressing the soil against the plant, just enough to eliminate any large air pockets without compressing the soil.

How-to-plant-in-a-container-1

Good soil will make its own mulch


  1. Add a final layer of much if you want to, the plant with sure appreciate it, although is not completely necessarily.


  2. Finally, water thoroughly, until water runs out the drain holes, to moisten the roots and to settle the soil.


And there you have it, the plant is set.

How-to-plant-in-a-container

Take good care and it will live happily


Keep it in place with plenty of light but away from direct sunlight for a couple of days If you can. Also take extra care of it for some time to make sure your plant adjusts to its new house. And remember, plants should be moved into larger containers as they grow. So you might need to repot them later, maybe every couple of years or less depending on the plant.


Sunday 23 January 2011

New everbearing strawberry for my garden

And yet again, I had another gardener compulsive shopping disorder episode. Last week I went to the garden center just to see what was in store for the winter.

new-everbearing-strawberry-for-my-little-garden-in-japan1

My new everbearing strawberry


Since winter is coming, they don’t have as much flowers anymore. However, they did had a bunch of plum and cherry blossoms trees getting ready for spring, and some winter tulips too. I was almost going to buy some, but I managed to convince myself not to. I already have some tulips in my garden, so I can wait a bit. And the cherry trees are just to big for my small balcony. However, there was one thing I could not resist. They had some everbearing strawberries for sale! I just had to get me some.

From what I know, the everbearing varieties are a bit hard to get here in Japan. Last time, after loosing my crazy always blooming strawberries to beetles, I tried to get some more of the everbearing kind. But, even when I look on more than 10 places, I could not find them anywhere. I found that, here in Japan, summer blooming varieties are much more coveted than everbearing, so it's very unusual to find the plant for sale. I was also surprised to find out that mines where not really true everbearing, they just had a lucky mutation that gave them that characteristic.

new-everbearing-strawberry-for-my-little-garden-in-japan

And this one is still blooming growing fruit!


So, when I saw this one for sale, I had to buy it. And even more after finding they only had three plants left.

I hope it grows well on my garden. I still have to find it a place. I think I will put it in the same pot with the others, but I am hesitant in case something happens and some disease wipes away all the strawberry pot like last time. You can never be to careful with your strawberries.

Friday 21 January 2011

A little about Wasabi and Shiso

First of all, I want to thank everybody for participating in the world garden carnival! We had almost 50 entries with a lot of amazing ideas and projects for the starting year. It is always great to see so many gardens around the world and get to meet so many people.

It always amazes me how we can connect even when we are so far apart. I feel like you are all my neighbors from around the block. We ask each other for advice, give support, and share our passion for gardening. Thank you very much!

It also amazes me how much inspiration can surge, from this interactions that we might not otherwise have. I have come up with so many ideas and I discovered some activities that I really enjoy thanks to this. For example, lately, I have been getting some mails and having some conversations, where I have been asked about "how to grow", "how to take care" or just special questions about plants or gardening.

Now, I must say, I am not an expert. I might have some knowledge and practice on growing plants and gardening in general, but I still have a lot to learn. But that is precisely the part that I have found most fun. When asked about things I don’t know, I try to go and look them up. It might be my researcher nature, (that is what made me go into engineering and academics) because I really like investigating, researching and coming with a proper answer.

One example is, some time ago, I had a couple of mails from Cina from My Obsession My Compulsion. (She gives a lot of very detailed information on a great variety of plants on her blog. Check it out if you can) where she ask me if I knew something about some Japanese herbs. Although I didn’t knew much of the herbs in question at that moment, I was more than happy to help her.

I look around and in the end I did got some good information that I hope was useful for her. I enjoyed a lot researching for this data, and I learn a lot while doing it too. Here is a tiny bit of what I found on some of the plants she ask me about.

About wasabi


IMG_5017 Wasabi plant

Wasabi plant


  • A staple of Japanese cuisine.

  • It is also known as "Japanese horseradish".

  • Its root is used as a condiment and has an extremely strong flavor similar to mustard.

  • Wasabi is a Brassica, so it is related to Cabbages, Cauliflower, Broccoli.

  • It is a very hard pant to grow because it has very specific requirements.

  • If grown correctly it will grow slowly for two years before is ready to harvest.

Wa-sa-bi

Wasabi growing in the mountains of japan


  • It prefers cool, shady conditions. In japan it is usually grown in the mountains, using the running water from misty mountain streams.

  • At home might be best kept in a Aquaponics system, to keep them wet all the time, even the seeds won’t survive long time without the proper moisture.

  • The hardest part of growing wasabi might be getting a viable plant, seeds or plants are not easy to find.


A little about Shiso


Shiso

Shiso plant


  • Also known as perilla ot beefsteak plant.

  • Great herb for cooking, garnishing and with some medicinal proprieties too.

  • It grows up to 130 cm tall. It has big and toothy leaves, with ruffled edges, and fine hairs on them.

  • It comes from the same family as basil, so the flavor is somehow similar but the texture is very different.

  • It is a very nice plant to have. It is an annual, but it reseeds easily with the proper conditions. Goes great with sashimi.

Shiso Leaves

Shiso is a great for cooking and garnish


I will post more about this and other Japanese herbs later. In the meantime, if you have any question that I might help, feel free to send me a mail. I will try to give my best knowledge. Or, if I don't know, I will look around for the best answer possible. It might take a bit for me to get back to you if I get "school busy", but I will try to answer as fast as I can.

Also, while we are on the subject of online gardening neighbors. I want to give a special thanks to Jo from The Good Life for giving me a blogger award. I enjoy your blog very much too. Thank you!

Monday 17 January 2011

World garden blog carnival. Gardening for the new year

Time for the carnival. I hope we get a lot of nice posts to showcase.

I have a lot of projects coming for this year. And one of the most important is my grape.

My-blueberries-and-some-autumn-color-in-my-garden-2

My grape fading into winter


I have always wanted to grow a grapevine in my garden. But, I always thought it would not happen until I got a house for myself. When I started my little garden here I considered buying one for one moment, but then I thought there would be many problems when caring for one in a small balcony and I kept coming up with excuses not to do it.

Even when growing on a small container grapevines can spread quite far. And since I don't have a permanent house yet, I didn’t wanted to risk having the grapevine climbing all around a balcony and then having to move and loosing all the effort from that year.

my-grapevine-4

I hope I can train my grapevine like this


But, one day when I was at a library looking at gardening books (And I mean looking because I cant read that much japanese, so I usually only look at the pictures) I saw a very nice photo of a grapevine growing on a small pot, all coiled around itself and with a lot of fruit hanging. The pot could not had been more than 15 cm tall, and the hole plant looked under a meter, but yet it had a lot of fruits. It had never occurred to me that was possible! Back in my country I have always seen it growing big, even when in a small pot. I don’t know why I didn’t thought of it before.

my-grapevine

I already set it up for starting


I looked around more in the Japanese books and the same layout was in almost all of them. They all explain more of less how to do it. I guess in Mexico we don’t try because we have the space. But here in Japan, where space is a luxury some times, growing mini grapevines is common. That is the good thing about traveling, it helps expand the horizons and think outside our own box.

my-grapevine-2

Just have to keep the branches in order
and make some good pruning


So having no more valid excuses, I got my grapevine. I also got a nice planter and some bamboo sticks to make the frame. The plan is very simple, let only one or two branches grow, keep it coiling around itself and prune a lot to keep it tight. Hopefully next year I will have it set and I will get some nice fruit our of it. The original photo I saw in the japanese book only had one level of "circling", but my planter is quite big so I think I can get away with a "two stories grapevine".

my-grapevine-3

By the end of the year it should be ready


Oh and also, some time later I saw them in person. They had a couple in the garden center. I have even seen a bonsai grapevine with some fruit too. That should teach a lesson about thinking out of the box.

Now is your turn, What are your gardening plans for this new year?


For the blog carnival, please input the link directly to the post you are submiting in the widget below. Just click the blue button that says add your link.

Remember it must be a post about what do you plan on doing at your garden this year, maybe about one particular plant you want to have, a renovation you will do, a special patch you will grow, a new gardening technique you will give a try, or any other project you have prepared for this new year.

If you have more questions about the carnival or you want to add a link to this page click here to go to our carnival main page. There you will find more information and some resources you can use.

Or if you want to see past carnivals click here.

Also, add a comment if you like and let us see what your garden is bringing this new year!


Saturday 15 January 2011

The rosemary is blooming in winter!

Last December was a bit more warm than expected, and that brought a couple consequences to my little garden.

The main effect, I had already mention it, was the tulips sprouting way ahead of time. They have slowed down they growth now, but somehow it feels like a time bomb now. Hopefully they will be ok.

However the warm weather did came with other more beneficial results. The strawberries got a late, but much needed, last growth. They still have a couple leafs half out, but I think now they might be strong enough to hold on during winter. Another well received consequence was the flowers lasting longer. According to what I knew, a couple of the flowers in my garden should have gone to sleep by now, but they are still blooming nicely.

rosemary-blooming-in-winter

My rosemary is blooming in mid winter


And the final and least expected result was the rosemary suddenly flowering. The slight heatwave got to her. It starting forming a bunch of little buttons late December and now they are opening. It still has quite some unopened, but the cold weather is finally reaching us. I hope they get to bloom before the hard winter hits; They do look very pretty.

I added this entry to bloom day! at may dreams gardens

And remember, the carnival is on the 17th!

Be ready with a post about what do you plan on doing at your garden this year, maybe about one particular plant you want to have, a renovation you will do, a special patch you will grow, a new gardening technique you will give a try, or any other project you have prepared for this new year.

Time to harvest the seeds from the globe amaranth

One of the favorite flowers of my garden this year was the globe amaranth (gomphrena globosa). It had an amazing color, with a lot of flowers and buttons.

More-flowers-for-blooming-day-6

Globe amaranth is definitely one of my favorites


Funny thing, globe amaranth it is native back at my country, but I didn't knew the plant until I got to japan. They are very common here. Usually they are grown in gardens as cut flowers, but it is also normal to see them as a urban wild flower. I have seen many growing on some sidewalks or on the ground patch around the train tracks.

Their name here is 千日紅 (せんにちこう), which translates something like a thousand days red. I think is a perfect name, because flower's color last so long. Even now that mines were so dried the little globes still have very vibrant colors.

globe-amaranth-seeds

My globe amaranth was almost completely gone


Because I liked them so much, I wanted to have it again next season. So I decided to harvest some seeds from my plant. I wanted to wait until the plant dried completely by itself. But I don't really had the space, so when I moved things around to make space for the new rack I had to take it out.

I took out the heads from the dead flowers and save them apart to let them finish dry. I could tell many of the lower seeds were ready to pick but they still had a bit of moisture on the tip of the flowers. I think is best if I wait a bit longer to set them apart. I really hope they will grow well next season and bloom as nicely as this past ones.

globe-amaranth-seeds-1

I will store this Globe amaranth seeds after they dry


I would recommend to any gardener to have some on their garden. Because of their height I think they will make very nice background flowers. It is a beautiful plant, very hardy and with blooms that last forever. They even add a nice touch of color even when they are dry.


And remember, the carnival is on the 17th!

Be ready with a post about what do you plan on doing at your garden this year, maybe about one particular plant you want to have, a renovation you will do, a special patch you will grow, a new gardening technique you will give a try, or any other project you have prepared for this new year.

Tuesday 11 January 2011

The banana peels fertilizer works very well

If you haven't come here lately, you can probably notice I did quite some changes. Like I said back in the new year post, I have a lot of projects and ideas I want to try and share. I feel very motivated about continuing with the blog, it keeps growing more and more every day. You have given me a very nice response, so I will put more effort into continuing it. Thank you very much!

Internet tree

This is my new Internet tree


The first change I did was the layout. I think three columns will give me a better space for very needed internal links. I have a lot of projects on the way, and there is where they will live. I hope you don’t mind it takes a bit of space from the post, I tried to keep them the least intrusive. I also tried to keep the space to have big enough photos, because the photos always get many praises.

Other change, is the blog carnival icon on the upper left corner. That will be the entrance to the carnival introductory page, feel free to pay it a visit. All the carnivals, that were and will be, will be accessible from there.

One more change is the header. I am experimenting with a lot of tools and styles, and I plan on changing the header and the background accordingly to the season let me know which one is your favorite.

I also did a lot of little changes. Things like margin size or where some icons go. The menu bar, the search bar and others. I hope it looks better and more professional now.

The last new feature is the social media buttons Internet tree on the upper right corner. I feel specially proud of this one. I did the drawing almost from the scratch and I had to do a lot of learning to have the links and everything on the right place and working properly. Also, I end up doing a lot of little drawings that I won’t use, but I think others might find useful, so be on the lookout for a goodies page. I will put them all there.


Ok, now on to the gardening matters. Last post I got a couple questions about banana peels fertilizer. I had done a post about it back in November, but I didn't showed the results. Well, here they are. Back then, because I didn't had many peels, I had only put fertilizer on one of my flower pots, the one that needed it the most. So only one got the benefits and now I am seeing the differences.

I think is a fair comparison. Both planters have almost the same kind of flowers, they get the same amount of sun and of water and the soil where they are planted comes from the same bag. Also, I normally trim the dead buttons to keep them flowering, though lately I have not done it as much because I am waiting for seeds.

On with the comparison then. First planter A, I did not put any fertilizer on this planter. It bloomed beautifully back when it was new, but with the cold it slowly started to recede. Here is the photo of flower planter A.

The-banana-peel-fertilizer-works-well-3

These flowers need some banana fertilizer urgently


As you can see the pansies and the alyssum hardly have any flowers. The lemon marigold, even though is very hardy, is starting to get bald. And the stock is down to its lasts flowers. The only one that still seems strong is the Blue ballon scabiosa.

Now planter B, the one that got its dose of banana fertilizer. This one was starting to have less flowers back then, that’s why I decided on using the banana peels on it. Here is the photo of flower planter B.

The-banana-peel-fertilizer-works-well-2

This ones are blooming nicely because
they already got banana peels fertilizer


What a difference! The pansies are in full bloom, and with a lot of new buttons coming up. The stock has lasted much longer, and still have buttons. The cosmos, even tho is not as resistant as the mint marigold, still has a lot of its flowers. Also, the alyssum is much more grown and flowered.

That is the difference that a little of homemade banana fertilizer can make. Which teaches me that I should have putted some fertilizer in both planters back then. But in the end it is no problem, because, I recently got a new bunch of bananas and I am planning on making a lot of milkshakes out of them. I have to get them very green so they last long enough for me to finish them.

The-banana-peel-fertilizer-works-well

I can get a lot of banana fertilizer out of this one


Click here for my old post about making banana peel fertilizer for containers.


And remember, seven more days to the carnival!

Be ready with a post about what do you plan on doing at your garden this year, maybe about one particular plant you want to have, a renovation you will do, a special patch you will grow, a new gardening technique you will give a try, or any other project you have prepared for this new year.

Sunday 9 January 2011

Time to dig up the calla lily bulbs

Earlier this month, I dug up my calla lilies. Normally calla bulbs are taken out from the ground in fall, but here in japan we have a more tender temperatures, so calla lilies take a bit longer to fade into bulbs. They even had some foliage in late December, I think the slightly warmer month we had help them stay around so long.

dig-up-the-calla-lilies-4

My Calla lily blooming this past summer


I was a bit afraid they would not be in a good condition because this summer they suffered heavily from the vacation drought. Back then they dropped a lot of leafs and also some went limp. I thought it would have stopped their development or even worst they could have gone rotten. Luckily, they all seem to be ok. Some didn’t grow as much, but I have at least four that I think have a decent size, also, none show any sign of rot.

dig-up-the-calla-lilies

The first pot had some small bulbs
but a couple promising enough


When I dug them up, a couple still have a fair amount of roots, so I let them be a bit longer in the soil. I think with the recent cold and no water, they should drop the remaining roots very soon, I will check on them next week. The rest are sitting in a little wood pot outside to harden them a little. I will get them in a better place later.

dig-up-the-calla-lilies-2

The second had much better bulbs,
but they still had a lot of roots


I feel so lucky my calla lily keeps on living, back when I got it I almost kill it because I had no idea how to take care of it. I didn't even know its name, I just bought it out of a whim. Little by little, with a lot of luck and some research, I have learn more about them and their care, and this year everything seems to have gone well. They bloomed beautifully and it seems I have at least other three or four new bulbs that will possibly bloom next year.

dig-up-the-calla-lilies-3

Calla lily bulbs ready for next season


Maybe next year I will wait a week or two more before taking them out, and of course I will try avoid any more droughts. Also a bit of banana fertilizer at the beginning of their growth should help them get stronger.

Also, if I see any other nice color I will make sure to add it to my garden. I already have my eye on a beautiful yellow variety.


One more thing, remember, the Carnival will be this January 17th!

new year gardening resolutions

New Year Gardening Resolutions


Be ready with a post about what do you plan on doing at your garden this next year, maybe about one particular plant you want to have, a renovation you will do, a special patch you will grow, a new gardening technique you will give a try, or any other project you have prepared for this new year.

Thursday 6 January 2011

My little garden in Japan January 2011


And with the start of the month, here is how my little garden in Japan is doing.

mygardeninjapan-january-2011-2

New year and new layout


Winter is finally coming to us. The temperature will start to go lower, and the plants sure are noticing it. I will have to build some sort of protection for them eventually. But on the bright side, the dark days are leaving. Every day now the sun rises sooner and leave us later. I think is a fair trade off.

mygardeninjapan-january-2011-4

My new rack is all full


Because I didn't have much space on the garden, I had to buy a small metal rack. Now most of the plants are stored in it. But I know that I will have to rearrange everything once again when spring comes. Hopefully I will be in a new house with a bit more space by then.

mygardeninjapan-january-2011-3

I will have to move everything back in spring


They are not that many highlights for this month, just the geraniums that are developing new blooms and the rosemary with a lot of new growth. This month will be of preparation I think. Preparing for the cold, and storing away seeds and bulbs.

mygardeninjapan-january-2011

Winter blooms of pansies


I made a list for keeping track of how all the plants change every month thought the year. Hopefully it will work as a baseline and a reference for future seasons. And maybe somebody else find it useful

I had no idea I had so many plants until I made this list. Some of them I have repeated, like the mints or the veggies, In total there must be around 60 plants in the garden. I have no idea how they all fit there.


Plant January For us this is the start of winter.

Temperature

9 °C //1 °C The temperature will start to lower considerably, but we dont expect snow yet.

Fruit

Strawberry

Growing

Seems to be holding to winter, and it's slowly growing

Grapevine

Sleep

It already enter it's dormant stage, I will have to wait until next spring

Blueberry

Fall leaves

Still have the fall colors. I guess it will drop the leafs this month.

Herbs

Dill

Growing

Growing nicely but slowly. A bit damaged by the cold tho

Cilantro

Seedling

A lot of seedlings, I hope they make it in the cold.

Oregano

Growing

Growing nicely but slowly

Rosemary

Growing

It has a lot of new growth. I hope it will do fine.

Mints

Growing

Growing crazily as ever. It doesn't matter the cold, nothing stops them

Maguey

Growing

Some new leafs. It seems to be used to the new country.

Aloe

Growing

A bit damaged, but seems to be finally growing new leafs.

Lemon Thyme

Growing

Growing nicely but slowly

Lavender

Growing

Growing nicely but slowly

Lemon balm

Growing

Growing nicely but slowly

Thyme

Growing

Growing nicely but slowly

Chive

Seedling

Growing nicely. Even the ones I put on the strawberries

Vegetables

Lettuce

Seedling

It is past their season, but they seem to be growing regardless.

Bekana

Seedling

Funny looking little seedlings seem to be fine

Spinach

Seedling

Seems to be growing fine

Komatsuna

Seedling

Growing slowly, but nicely. I have to protect it from the cold tho.

Flowers

Tulips

Bulb

Besides from the little grow sprout last month, everything seems to be normal

Geranium

Blooming

The red is amazingly developing new blooms, but the white is starting to get the white leafs. (link)

Pansy

Blooming

With a lot of beautiful flowers.

Alyssum

Blooming

It is starting its second bloom sprout. I think it will last all winter

Red Rose

Fall

With the coming cold it started to lose some leafs. I hope it will hold the winter well.

Stock

Seeding

On its last blooms, with a lot of seed capsules

Mint Marigold

Blooming

Still blooming strong

Winter Cosmos

Blooming

A bit bald from the wind, but still blooming nicely.

Nochebuena

Sleep

Because if the cold and the lack of care when I was away, It lost most of its leaves. Poinsettias are such delicate plants.

Calla lily

Bulbs

I just dug the bulbs, and getting them ready to storage for winter.

Mini rose

Fall

Start to grow less, I think it will start to go dormant soon

Other flowers

Blooming

The other flowers are still blooming,  I think at least until next month

Trees

Only have one tree now, my momiji

Maple

Fall

A lot of dried leaves. It is entering its dormant stage


Oh, and remember, the Carnival will be this January 17th!

Be ready with a post about what do you plan on doing at your garden this next year, maybe about one particular plant you want to have, a renovation you will do, a special patch you will grow, a new gardening technique you will give a try, or any other project you have prepared for this new year.

Monday 3 January 2011

My visit to the Hong Kong Flower market

On my little trip to Hong Kong this Christmas one of the places I visited was the Hong Kong flower market, a very colorful and lively place. It is a small market covering only two blocks, but it has a lot to see and enjoy.

Hong-kong-flower-market-7

The Hong Kong Flower Market


I felt it very contrasting to what I find here in Japan. Here you can sense an order even when it might not be as obvious, but in hong kong it was all chaotic. People walking here and there, men pushing trolleys and yelling to people to get out of the way, customers arguing to lower the price, sellers loudly advertising their products, a hundred scents from flowers and food. It remind me so much of Mexico, It was exactly like what you can see at the markets there, just with Chinese. Of course I felt right at home.

Hong-kong-flower-market-6

Very similar to the flower and garden markets in Mexico


Hong-kong-flower-market-2

They have a very nice variety of plants and flowers


They had some exotic plants, and some very nice deals. In one place they were selling a bunch of beautiful orchids for 10 HKD each, that is like 1.2 US dollars or 0.8 British pounds. They also have some rare flowers that I am not sure what they are. Too bad It is not possible for me to bring plants back to my little garden in Japan.

Hong-kong-flower-market-5

A bunch of pitcher plants ready for sale


Hong-kong-flower-market-8

What is the name of these?


One interesting thing I noted was, how all the selling were directed to "lucky plants". They have so many superstitions and they affect many of the aspects of their life, and as it was to be expected, the same goes for plants. For example, most of the plants and the cutting flowers they sell have a very specific meaning. They have get money plants, get health, to celebrate a new house, for the new year and many others.

Hong-kong-flower-market-4

Beautiful cutting flowers


Hong-kong-flower-market-3

More potted plants ready to go to a new home


If you are ever in Hong Kong and you like plants I recommend you to go. They have a huge variety of flowers and plants for sale or just for admiring. It's truly a fun walk.

Hong Kong Flower Market


Flower Market Road, Mong Kok. Opens from 7am to 7pm.

How to get there
  • MTR Prince Edward Station Exit B1.
    Walk east along Prince Edward Road West.

  • MTR Mong Kok East Station Exit C.
    Walk to Sai Yee Street via the footbridge and follow the signs.


Hong-kong-flower-market-1

Visit the Hong Kong Flower Market


On a different subject, the Carnival will be this January 15th 17th! Sorry I changed the date, I didn't want to clash with a fellow blogger meme.

Be ready with a post about what do you plan on doing at your garden this next year, Maybe about one particular plant you want to have, a renovation you will do, a special patch you will grow, a new gardening technique you will give a try, or any other project you have prepared for this new year.

Related Posts Plugin for WordPress, Blogger...